My first post ever since I passed CCIE. I feel like I've been slacking.
This is a short post. It is treated more as my notepad for future configuration. I recently get contacted to create a Site-to-Site VPN tunnel to Azure Cloud. Just like VMware vCloud, Azure doesn't really display lots of technical detail, so creating the tunnel can be a bit challenging.
Here is the default in Azure:
IKE Mode: IKEv2
Phase 1
- Encryption: AES-256
- Hash: SHA1
- Lifetime: 28800 seconds
Phase 2
- Encryption: AES-256
- Hash: SHA1
- Lifetime: 3600 seconds
- PFS: disabled.
Note:
- if you're using Cisco ASA, use the same settings, but IKEv1, doesn't matter if you're running 8.4 or 9.1.
Friday, October 7, 2016
Monday, July 18, 2016
I passed! CCIE# 53519
Finally, four attempts, countless hours of labbing, I have earned my number, CCIE# 53519
Saturday, July 2, 2016
Microburst/Burst Traffic: Cisco Nexus 9508 with N9K-9564PX linecard - ALE/Northstar Buffer
Just as my normal working and study life, my blog posts are flipping back and forth between work-related and study-related content. Today is work-related.
My company recently purchased a pair of Nexus 9508 Chassis, and I chose line cards N9K-9564PX as the default line cards for these chassis. In this blog post, I will talk about what we have run into with these line cards in the first 30 days in production, and what we have done (with TAC help) to resolve it.
Intro
Let's start with my selection. Cisco has 2 line cards for Nexus 9508 that provides 48-port 1 and 10 GE SFP+, N9K-9564PX and N9K-9464PX. The 9500 model support VXLAN. That's was the main reason we decided to go with 9564PX.
The Problem
Within the first 30 days of deployment, I have notice that both chassis have a lot of output discards, while the port utilization is fairly low. Below is a sample of our traffic between June 10th and June 16th for the Top 10 interfaces on one chassis, and top 10 interfaces with output discards
As you can see, none of our interface max over 10Gbps, and yet, we had a lot of discards. At a given time of the day, we have 7 packets drop per seconds, that is a lot of packets over a short period of 1 minutes. This means we have lots of micro-burst in our environment. I actually knew about this, and this was why we went from Nexus 5548 to these chassis to improve the performance and take care of micro-burst. Obviously, at default state, these new line cards still couldn't handle the burst in our environment. Noted we have Jumbo frame enabled for iSCSI.
The Buffer
Before we go into the solution, let's visit the buffer structure on these line cards. Cisco published a white paper on Cisco Nexus 9500 Series Switches Buffer and Queuing Architecture (hyperlink). Please feel free to read it if you're interested. In short, the 9500 line card has 2 buffers: Network Forwarding Engine (NFE) and Application Leaf Engine (ALE).
The NFE is a 12-MB buffer, shared among all active ports for both ingress and egress direction. Once the NFE is filled, the additional packets will overflow to the ALE's hairpin buffer.
The ALE is a 40-MB buffer, that got split into 3 regions:
The Solution
I'm sure by now you have figure out what we did to resolve our issue. We have changed our buffer from "Mesh Optimized" to "Burst Optimized" and that seem to take care of our burst traffic. We still have minor discards (1 or 2 over the course of 2 days), but to me, that is still acceptable. In addition, we still have "Ultra Burst" option available. Below are the very few commands to change buffer on these line cards
My company recently purchased a pair of Nexus 9508 Chassis, and I chose line cards N9K-9564PX as the default line cards for these chassis. In this blog post, I will talk about what we have run into with these line cards in the first 30 days in production, and what we have done (with TAC help) to resolve it.
Intro
Let's start with my selection. Cisco has 2 line cards for Nexus 9508 that provides 48-port 1 and 10 GE SFP+, N9K-9564PX and N9K-9464PX. The 9500 model support VXLAN. That's was the main reason we decided to go with 9564PX.
The Problem
Within the first 30 days of deployment, I have notice that both chassis have a lot of output discards, while the port utilization is fairly low. Below is a sample of our traffic between June 10th and June 16th for the Top 10 interfaces on one chassis, and top 10 interfaces with output discards
 |
| Top 10 Total Bandwidth |
 |
| Top 10 Interface with Output Discard - Display in packet/seconds |
The Buffer
Before we go into the solution, let's visit the buffer structure on these line cards. Cisco published a white paper on Cisco Nexus 9500 Series Switches Buffer and Queuing Architecture (hyperlink). Please feel free to read it if you're interested. In short, the 9500 line card has 2 buffers: Network Forwarding Engine (NFE) and Application Leaf Engine (ALE).
The NFE is a 12-MB buffer, shared among all active ports for both ingress and egress direction. Once the NFE is filled, the additional packets will overflow to the ALE's hairpin buffer.
The ALE is a 40-MB buffer, that got split into 3 regions:
- 10 MB for direct ingress traffic from the ALE to fabric modules (backplane).
- 20 MB for direct egress traffic from fabric modules to ALE.
- 10 MB for hairpin traffic - traffic between 2 ports on the same line cards. This is consider an additional 10 MB for NFE
The Solution
I'm sure by now you have figure out what we did to resolve our issue. We have changed our buffer from "Mesh Optimized" to "Burst Optimized" and that seem to take care of our burst traffic. We still have minor discards (1 or 2 over the course of 2 days), but to me, that is still acceptable. In addition, we still have "Ultra Burst" option available. Below are the very few commands to change buffer on these line cards
show hardware qos ns-buffer-profile
hardware qos ns-buffer-profile {burst|mesh|ultra-burst}
Sunday, June 19, 2016
CCIE RS Lab Attempt (RSv5) : what to expect and what not to do
I failed my 3rd attempt on RSv5 lab 2 days ago. My 4th one is scheduled and hopefully it will be my last one. Throughout these 3 attempts, I've gained lots of experience. I want to share them here, for anyone who is studying and thinking about attempting the lab. I hope whatever I post here will help you gain some confidence, avoid panic attack and hopefully don't have to pay too much money for a free lunch in San Jose or RTP.
A few things I would like to mention before we move on:

Added
Just for the fun of the post, I have edited and add my results in here, just for fun.
A few things I would like to mention before we move on:
- There will be 0 information about the contents of the actual labs.
- I will not tell you how to study, or how many hours you should prepare before attempting, because lots of people have already done that, and I haven't passed yet so I don't know how many hours total I'm putting into this.
- I will not compare, or even attempt to compare training vendors.
Let's move on. I've used both RTP and San Jose for my attempts. Therefore, I'll start with what you want to prepare before physically stepping into the room and sit down for 8 hours. You might laugh at some of the bullet points below, but trust me, I do not list anything I haven't seen.
- Be On-Time. Do not expect the proctor to wait for you, because he/she has to ensure that it's fair for your fellow test takers who come on time.
- Bring your jacket, wear long sleeve. The lab is cold. To me, RTP room is a bit colder than San Jose room. I highly recommend a light jacket and long sleeve. Make sure your sleeve can roll up easily, the proctor need to see your wrists and a bit higher toward your elbows. Don't be that guy/girl that wears tight shirts and get yelled at right before the lab.
- If you have medicine, you can bring them, Advil, Tylenol, or whatever it is. Just make sure to tell the proctor before you sit down.
- You will be asked to turn off your phone. Here is my tip: turn the darn thing off before you walk-in. On my 2nd attempt, one guy was checking email while the proctor was going through the rules, of course he got yelled at.
- All of those lead to this important point. We are all adults, and I'm sure we all have some kind of success in our career right now, before stepping into that room in hope of getting that beautiful 5 digit number. Be professional and follow rules and you will be ok. It sounds simple, but since everyone is under stress, I've seen lots of funny situations. Rules are pretty much written everywhere, either on the board, or at your desk. Read them and follow them, you will be fine. I'm strictly talking about Route and Switch. There should be 0 issue about the contents, or devices in our lab.
- If you easily get nervous, don't talk to people before the lab. If you run into me, who failed 3 times and I tell you that, I'm sure you will freak out.
- Watch out for Voice guys. Bring your earplugs. If you're in the same room with one or a couple of voice guys, their phones will ring. Oh and they don't ring at the beginning when you're mentally strong and focus. They will ring at the end, when you are 6 hours in, about to loose your focus.
- Last is totally unrelated to test day: buy Logitech K120 keyboard. It's the same keyboard in the lab. I'm glad I did it. When I first switched my fancy keyboard back to this one, I made tons of typo. You don't want to do that in the lab. It's cheap, get it, and use it to lab at home.
Diagnostic.
I'll talk about Diagnostic section first because this is the one part that everyone finds it's difficult to practice at home, therefore it turns out to be the section that we prepare the least.
- 30 minutes is really short. Shorter than you would ever imagine. It is also a fixed 30 minutes, means if you finish early, you wait until 30 minutes elapse.
- I've heard people said diag is like CCNP tshoot. No, no and no. You have 4 hours in CCNP tshoot, you have 30 minutes in diag. CCNP tshoot is CCNP, this is CCIE. Do not walk into the lab, thinking this is the easiest part of your lab. It will be the part that you hate the most.
- But... there is always a but, Cisco knows you only have 30 minutes, so stay calm. Cisco do not ask you to fix crazy stuff, they save that for troubleshooting. The moment you panic, you're done.
- Make sure you plan out your time correctly. Divide 30 minutes out according to your total number of questions. You will know how many tickets you have on your DIAG on the very first page after you begin the section.
- Sometimes, the answers options are the best clue. Please note I say sometimes. Give yourself time to look at the answers options, it might help.
- I put this here because I got cocky on my 3rd atttempt, and panicked because the assumed resolution didn't show up as one of the answer option. I lost 15 minutes on first ticket, cost me my 3rd attempt.
Are you ready? This is the very first section you get in the lab. You have 2 hours, I think. I apologize, after 3 attempts, I'm still not sure if we have 2 or 2.5 hours here. In addition, you can add 30 more minutes if you want to. You just loose 30 minutes from your Configuration section. I used up the entire extra 30 minutes my first two attempts, only in the 3rd attempt I finished this section on-time.
- The tickets are fairly independent from each other. So this is the only section I would say it is safe to go from ticket #1 to ticket #2, then so on. I do not recommend it, but you can try resolving your tickets sequentially for TroubleShoot section
- Be aware of the awkward of Google Chrome in the lab. The topology resolution is really large, and yet the text are normal. So by default, you will see something like this.
- I normally do not troubleshoot well if I cannot see the entire topology. If you're like me, you will want to zoom out, and once you zoom out, you will end up with something below. Please note that it will also look like that even if you use two separate Chrome Windows. It's not that extreme, but it's close enough. You will not be able to read the text if you zoom out the topology.

- So be prepared and do not panic. Although the time is limited, give yourself 15 minutes to look over the topology, get a quick understanding of the overall before diving into the ticket.
- Be organized. Write down your tickets. Quick and dirty, no detail, maybe write down the protocol mentioned in the ticket and the location of the devices. I'll touch more on this when we get to Configuration.
- If you get stuck in one ticket for a while, move on. Again, they are mostly independent from each other, or even if it ties with some other tickets, who cares, move on, fix another independent one, get extra points before you run out of time.
- Make sure you match the requested output. More on this in Configuration section also. This is really important.
- I walked out of my 2nd attempt thinking for sure I woud pass. I fixed all tickets, I got all Diag, and completed Config. My result is 50% on TSHOOT. The only thing I could think of, is I forgot to write mem.
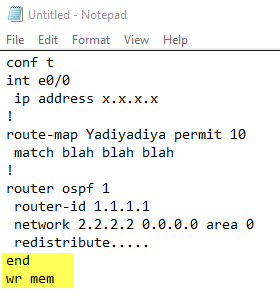
- Notepad is your friend. Do your config in notepad first, then paste them into the devices. If you do a show run for any particular section, paste them into notepad so you don't have to scroll up and down to look for it.
- In Notepad, do a small section at a time. I haven't seen it happening in real life yet, but I have heard a guy did everything in notepad at once, for all tickets. Then when he pasted them into the devices, nothing worked. Don't do that.
- Yes, you can save text file onto the computer's desktop.
Configuration
You're finally here. The last section of your entire journey, and the longest one. The biggest challenge here, in term of non-technical matters, is your mentality. You will get tired toward the end, means you will loose concentration, and miss small detail, or worse, you forget the entire task.
Therefore, the #1 non-technical thing in Configuration is "be organized".
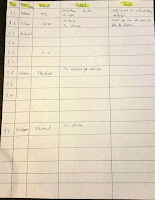
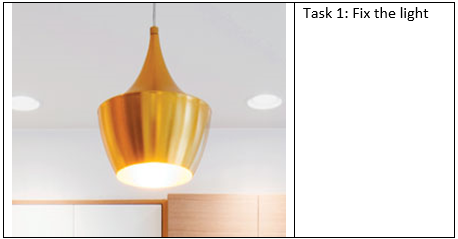
- Draw a table like below. Practice this skill when you lab at home. This is probably my only study-related advice for you. My next few bullet points will concentrate totally on this sheet of paper.

- Draw the table out before you start your lab (the real one), and I mean the entire lab. Normally the proctor give you about 5 minutes at the beginning for everyone to settle. Use this time to draw the table out. You don't want to waste your time drawing it out later.
- Fill out the content of the entire table before you put your hand on the keyboard for Configuration. I spent about half hour for my first and second attempt writing the content of the table. I spent close to 45 minutes on my third attempt.
- Let's touch on the detail why you need that table.
- You can keep track of what ticket you finished, and what you have left. How and which method you want to keep track is up to you. I just crossed out the tasks when I finished.
- The tasks are related, and not in the order of how you need to configure. Cisco has a very specific way to organize these tasks, and it's not helpful to you. Although my examples are not technical related, I want to give you an idea of how things are.
- Task 1.2 ask you to, at the end, test the telecom between the kitchen and the kid's room. but the detail of the task only ask you to fix telecom in the kitchen.
- Task 2.5 ask you to fix Electrical that is related to the entire telecom of the house
- And finally, task 4.5 asked you to fix telecom in the kid's room.
- So technically, you cannot test task 1.2 until you fix task 4.5. And my example is still follow some sort of order. Imagine if you have to fix electrical for telecom first, without even knowing what is wrong with the telecom itself.
- The table also help you fix things in group. For example, fix everything in the kitchen, then move on to bedroom, then move on to Living Room.
- The "Test" column has been the most important column for me. I passed all three configuration sections thanks to it. Like I mentioned above, you pretty much cannot test anything right after you finish that task, so at the end, this column will help you keep track of what test you still need to perform.
- The table is not the only thing you need. Do not forget the actual tasks list, especially for the "match-this-output" request. Most likely Cisco will ask you to fix something so it will match an output that they put in the ticket. Here is the rule: match it and match it exactly. There is no but or what if, nothing. If there is something you don't have to match, Cisco will tell you. Don't even bother go to the proctor and ask: "I cannot match this, is that ok?", they will not answer you, simply because they cannot answer you. Just match the output exactly.
- What if you cannot match it exactly although the ticket's faults are fixed, and have spent a decent amount of time on it? Move on, as long as you fixed the ticket already, move on. The worst thing is you lose points for that ticket, but you have the rest. I did that on my 3rd attempt for one ticket, and I still passed Configuration.
- Use Notepad. Just like troubleshooting, put your config into Notepad, then paste it into the device.
- You can avoid typo.
- You can copy and paste
- You can Search and Replace
- You can save, and review the config three tasks later without going into the device and do show run.
- Put "wr mem" at the end of each config to ensure you don't have to rush through over 30 devices at the end to do it. My config always look like this
Those are all I have for you. Hopefully I haven't broken any NDA, and I help you be a bit more prepared for your coming attempt.
This is a really long, tough, and lonely journey. There are lots of crazy people out there like yourself, taking on the same journey. Find them, join their study group so it's less lonely, and you can motivate each other. Don't be afraid of paying $1600 for a lunch, the next time you will be less surprised and more prepared. And if you failed more than once (like me), keep going.
Added
Just for the fun of the post, I have edited and add my results in here, just for fun.
 |
| First Attempt in RTP |
 |
| Second Attempt in San Jose |
 |
| Third Attempt in San Jose |
Sunday, March 13, 2016
Nexus 5548UP Firmware Upgrade with Dual-Homes FEXes
We have dual-homed our FEX for about 2 years now. Until recently, I have been told by lots of Cisco SEs that Cisco do not recommend dual-homed FEX, for various reason, including complexity.
We dual-home our fexes for a very specific reason, and I would still continue to do it for our 1GE FEX. Anyway, it's not the point of this post.
I have always been so worried about firmware upgrade the Nexus since the dual-home FEX is like an unknown area for me. Also, I know that our Nexus Environment do not qualify for ISSU since we have other switches downstream from the Nexus, that means we have to do DISRUPTIVE upgrade.
Today, I just went through the upgrade, from 6.0(2)N2(4) to 7.0(7)N1(1).
Before the upgrade, I found 2 articles from Cisco. One show how to do firmware upgrade on Dual-home FEX situation on 4.x, and the 7.x document that don't even mention about dual-home fex.
5.0(3)N1(1)
http://www.cisco.com/c/en/us/td/docs/switches/datacenter/nexus5000/sw/upgrade/503_N1_1/n5k_upgrade_downgrade_503.html
7.0(5)N1(1)
http://www.cisco.com/c/en/us/td/docs/switches/datacenter/nexus5500/sw/upgrade/705_N1_1/n5500_upgrade_downgrade_700.html#pgfId-641650
The #1 concern for me is that Disruptive Upgrade will reboot all FEX at once. The instruction is to upgrade Primary switch, FEX will get new firmware, but stay operation and not-yet-upgraded after Switch1 upgrades. After Secondary switch upgrades, all FEX will reboot at once and get new firmware. I don't like that at all. But I spotted on the early document that after Primary Switch is upgrade, the FEX will be "unrecognized" by Primary, but still fully operational under Secondary switch, which means I can manual reload the FEX, and when it comes back, it will be "online" with Switch-1, and "offline" with Switch-2 until Switch-2 upgrade. I couldn't get TAC to confirm my theory, so I bid the bullet and went through the upgrade. It went well, really well with no hiccup.
Below was the procedure, step by step.
1. Upgrade Primary vPC switch using "install all" command. Do not use "force" switch.
2. Once Primary is upgrade, it will also "upload" the new firmware to all FEXes, but the FEX will not be upgraded.
3. Wait 10 minutes after the Primary fully-operate after reboot, do "show fex". You will see that the Primary Switch now see all FEX with "AA .... not matching".
4. Connect to Switch-2 console, do "show fex" and all FEX are online.
5. Under Switch-2 console, do "reload fex xxx", one fex at a time. Switch-2 will state that FEX is down.
6. Connect to Switch-1 console, wait for roughly 3 to 4 minutes, the reloaded FEX will start communicate with Switch-1 (which is now in newer firmware). Wait until Switch-1 reports FEX is online, then repeat step [5 to 6] for the rest of the FEX.
7. After all FEX are upgraded and "online" with Switch-1, upgrade Switch-2 with "install all...." command.
That should wrap up the firmware upgrade process.
Thursday, February 18, 2016
Access-list Fun - CCIE R&S Preparation
I'm a few weeks away from my 1st attempt to CCIE Route & Switch Lab exam. In our study group, we call this period "Beast Mode". We lab daily, nightly, and try to all all day on the weekends.
Anyway, it's not the point of this post. As I lab through various workbooks, I always found myself stumble on getting odd Filtering task using Access-list. For some odd reason, wildcard always cause trouble in my head. 10 out of 10 times, I will figure it out correctly, but it takes me a while to get the calculation together. This time, I will write it in here. Again, I love disclaimer, and here is it again
"This is how my head agree on doing access-list with wildcard mask calculation. I believe everyone has a different way to accomplish the same task. If my method confuse you on step 2, stop and figure out your own way. The answer key is at the bottom of the post, as long as you can get to the correct answer (all the time), that's all that matter."
Assume we are running some routing protocol between R6 and R8.
 R8 has a list of Loopback Interfaces.


Anyway, it's not the point of this post. As I lab through various workbooks, I always found myself stumble on getting odd Filtering task using Access-list. For some odd reason, wildcard always cause trouble in my head. 10 out of 10 times, I will figure it out correctly, but it takes me a while to get the calculation together. This time, I will write it in here. Again, I love disclaimer, and here is it again
"This is how my head agree on doing access-list with wildcard mask calculation. I believe everyone has a different way to accomplish the same task. If my method confuse you on step 2, stop and figure out your own way. The answer key is at the bottom of the post, as long as you can get to the correct answer (all the time), that's all that matter."
Assume we are running some routing protocol between R6 and R8.


You are tasked to ensure that R6 only see the ODD third-octet of that network ranges, means R6 should only see
There are several ways to do it. Like I stated above, my head hate wildcard, so I always start with regular subnet mask.
Method 1 - Be as specific as possible
Let's break it down. We don't care about 1st octet "192" and 2nd octet "168". Also the 4th octet "0" is typical. Using my windows calculator, I converted my 3rd octet to Binary
- 210 = 1101 0010
- 211 = 1101 0011
- 212 = 1101 0100
- 213 = 1101 0101
- 214 = 1101 0110
- 215 = 1101 0111
- 216 = 1101 1000
- 217 = 1101 1001
- 218 = 1101 1010
- 219 = 1101 1011
we need to filter all EVEN number, so that our final result should look like below in Binary
- 211 = 1101 0011
- 213 = 1101 0101
- 215 = 1101 0111
- 217 = 1101 1001
- 219 = 1101 1011
Looking at the binary, the below bit are the same
- 211 = 1101 0011
- 213 = 1101 0101
- 215 = 1101 0111
- 217 = 1101 1001
- 219 = 1101 1011
I will convert "1101 0001" back to decimal, which is "209". So our network will be 192.168.209.0.
Let's move on to the subnet-mask. The rule of subnet-mask is, "unchanged bit = 1" and "change bit = 0", so the subnet-mask for the ODD range, the 3rd octet subnet-mask is "1111 0001", which is "241" in decimal. The entire subnet-mask can be written as:
- Binary: 1111 1111 . 1111 1111 . 1111 0001 . 0000 0000
- Decimal: 255.255.241.0
The network we choose will be: 192.168.209.0/255.255.241.0
Now writing the ACL is easy
- access-list 10 permit 192.168.209.0 0.0.14.255
Method 2 - Be as broad as possible.
This method rely on the fact that the set of networks in R8 are limited to the range listed above. In another word, there is no 192.168.220.0/24, or even 100.5.27.0/24, basically those networks are the only network show up in R8 routing table.
1st and 2nd octet has no restriction, same as 4th octet. That's why instead of writing "192.168.x.0", we can write "0.0.x.0"
Now the "x" will be interesting. At the list below
- 211 = 1101 0011
- 213 = 1101 0101
- 215 = 1101 0111
- 217 = 1101 1001
- 219 = 1101 1011
That's all we need to worry about for Broad matching. We need ODD number, and if the 1st bit is "1", for sure we will yield ODD number, ranging from [1-255]. Again, our actual range in the router is [210-219], so even if our Access-List's matching range is super wide, we will still see the same matching as Method 1. Let's write out the network first: "0.0.1.0"
Applying the same concept as method one to this subnet-mask calculation, "unchange bit = 1", "change bit = 0", the subnet mask will be
- Binary: 0000 0000 . 0000 0000 . 0000 0001 . 0000 0000
- Decimal: 0.0.1.0
Yes, it looks like the network, no, they do not always match like this. The network we choose will be: 0.0.1.0/0.0.1.0.
If you put it into the ACL with wildcard mask instead, we will have
- access-list 10 permit 0.0.1.0 255.255.254.255
Conclusion
. This is strictly for CCIE Lab preparation. If you have to do this in actual network, you have too much fun. ;)
- Lot of workbooks, and practice lab or mock-lab's answer keys love method 2. I guess since it's broader, it will be safer if later tasks in the lab ask you to add more network into the Permit/Deny access-list. For me, first method works out better in my head.
- That's all I have for tonight. It's said that I only finished half of what I was planning to do tonight, but... I got to write another blog.
Good luck on your study! I hope you don't land on this particular post while searching solution for Production environment.
Thursday, February 5, 2015
TCLSH scripting for CCIE Study
I learned this from INE training videos, taught by Brian McGahan. A lot of people already share this out publicly. I mainly post this here to serve as my permanent notebook for my study
In a lab where I have 10 IPs I need to ping from 10 different routers, a tclsh script really speed up the process. I created the below script in Notepad
tclsh
foreach var {
192.1.1.1
192.1.1.2
192.1.1.3
192.1.1.4
192.1.1.5
192.1.1.6
192.1.1.7
192.1.1.8
192.1.1.9
192.1.1.10
} {ping $var
}
You can replace "ping" with "traceroute". Remember to enter "tclquit" once you're done.
Another note, notice the location of the brackets, this is the only syntax that actually works for me.
Have fun!
Tuesday, June 24, 2014
Policing Traffic per VLAN Interface (SVI) on Catalyst 6880-X
My first official technical post. Unfortunately, it is not about Data Center. My work has been dragging me into dealing with the new Catalyst 6880-X, so I have to delay my post on Data Center study.
In this blog post, I will share with you the configuration that I am currently using to apply Bandwidth throttling on VLAN interface using policing.
To understand Policing, and also burst rate, I would recommend the below 2 blog posts:
- QoS Traffic Policing Explain by Rene Molenaar: http://networklessons.com/quality-of-service/qos-traffic-policing-explained/
- The meaning of Burst Rate (BC) with Traffic Policing by Petr Lapukhov: http://blog.ine.com/2009/12/12/the-meaning-of-bc-with-traffic-policing/
For my configuration, I stick with the formula
bc = 1.5 * CIR
where bc is the burst rate, 1.5 is a golden value of token refresh rate (tc) and CIR is the Committed Rate.
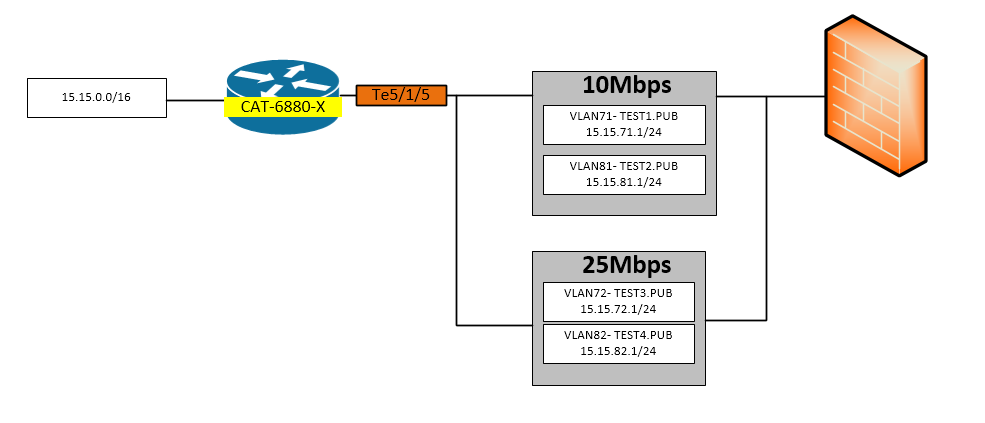
The goal is to policing incoming and outgoing traffic of on each vlan. VLAN71 will have full 10Mbps (CIR), allow to burst up to 15 Mbps (bc) (bc=1.5*10Mbps), same as VLAN81. With the same calculation, VLAN72 and VLAN82 will have 25Mbps CIR, and bc = 37.5Mbps.
A note from IOS CLI is that CIR's unit is bps (bit per second), and increment of 1000 (not 1024). BC's unit, however, is Bps (byte per second). So, the above number will turn out to be
- CIR = 10Mbps = 10,000,000 bps
BC = 15Mbps = 15,000,000 bps = 1,875,000 Bps
- CIR = 25Mbps = 25,000,000 bps
BC = 37.5Mbps = 37,500,000 bps = 4,687,500 Bps
Here is my config
1.) Enable QoS Police on the platform

4.) Enable VLAN-BASED QoS to the physical/trunk interface. The interface is actually Te1/5/5. I made a typo in my visio diagram above

5.) And finally, apply it to the SVI that I want to.
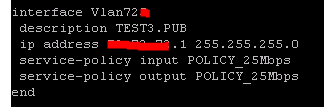

I hope this is helpful to anyone who land on my blog. It took me a while to finally get the config to work correctly. TC value is very important. Changing TC value will control the actual amount of bandwidth the interface allows.
One draw back on my post is that I haven't completely understand Policing yet. There are values and concept that for now, I'm taking it as it is. Eventually, I will follow-up with another post where I will take on QoS Policing and BC with my own understanding.
Thank you for reading.
Subscribe to:
Posts (Atom)